Revit MEP design Understanding the View Range
Learn how to adjust view range properties (Top, Cut Plane, Bottom, and View Depth) in Revit to control exactly how your roof, ceiling, and foundation plans display.

About Adjusting the Depth of a Plan View Revit 2020 Autodesk Knowledge Network
Watch on. Step 1: Understanding View Range Settings in Revit. Step 2: Setting up View Ranges for Standard Plans in Revit. Step 3: Understanding and Setting up View Range for Reflected Ceiling Plans in Revit. Step 4: Applying View Ranges to Revit View Templates. Step 5: Using Plan Regions alongside View Ranges.

Revit MEP design Understanding the View Range
In a plan view, Revit uses the following rules to display elements that are intersected by the cut plane:. Elements within the view depth are drawn using the

Revit Graphic Display Hierarchy 05 View Depth Line Styles YouTube
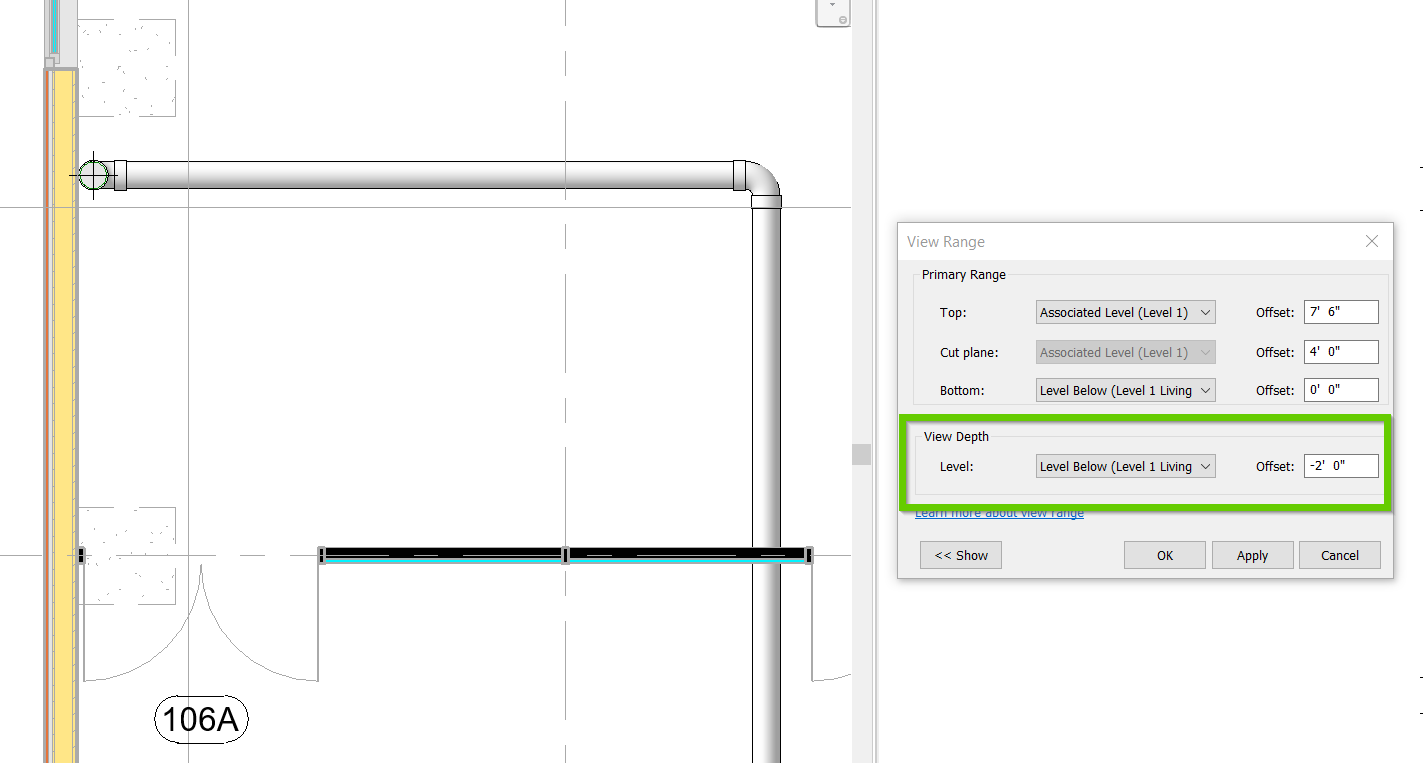
FLOOR PLAN VIEW. Go to the floor plan view and click in the View Range menu in the instance properties. In a Floor Plan view, the key parameters are Cut plane and Bottom. Set a level and a height offset for each of these parameter. Everything cut by the pink line (like in the image below) will display in thick lines.

Revit View Range Explained
Revit's View Range, sometimes referred to as the Visible Range, is a "set of horizontal planes that control the visibility and display of objects in a plan view" (knowledge.autodesk.com). Every plan view, including reflected ceiling plans (RCP), have this property. The View Range is made up of a primary range and the view depth.

Revit Architecture 2017 Depth Cueing YouTube
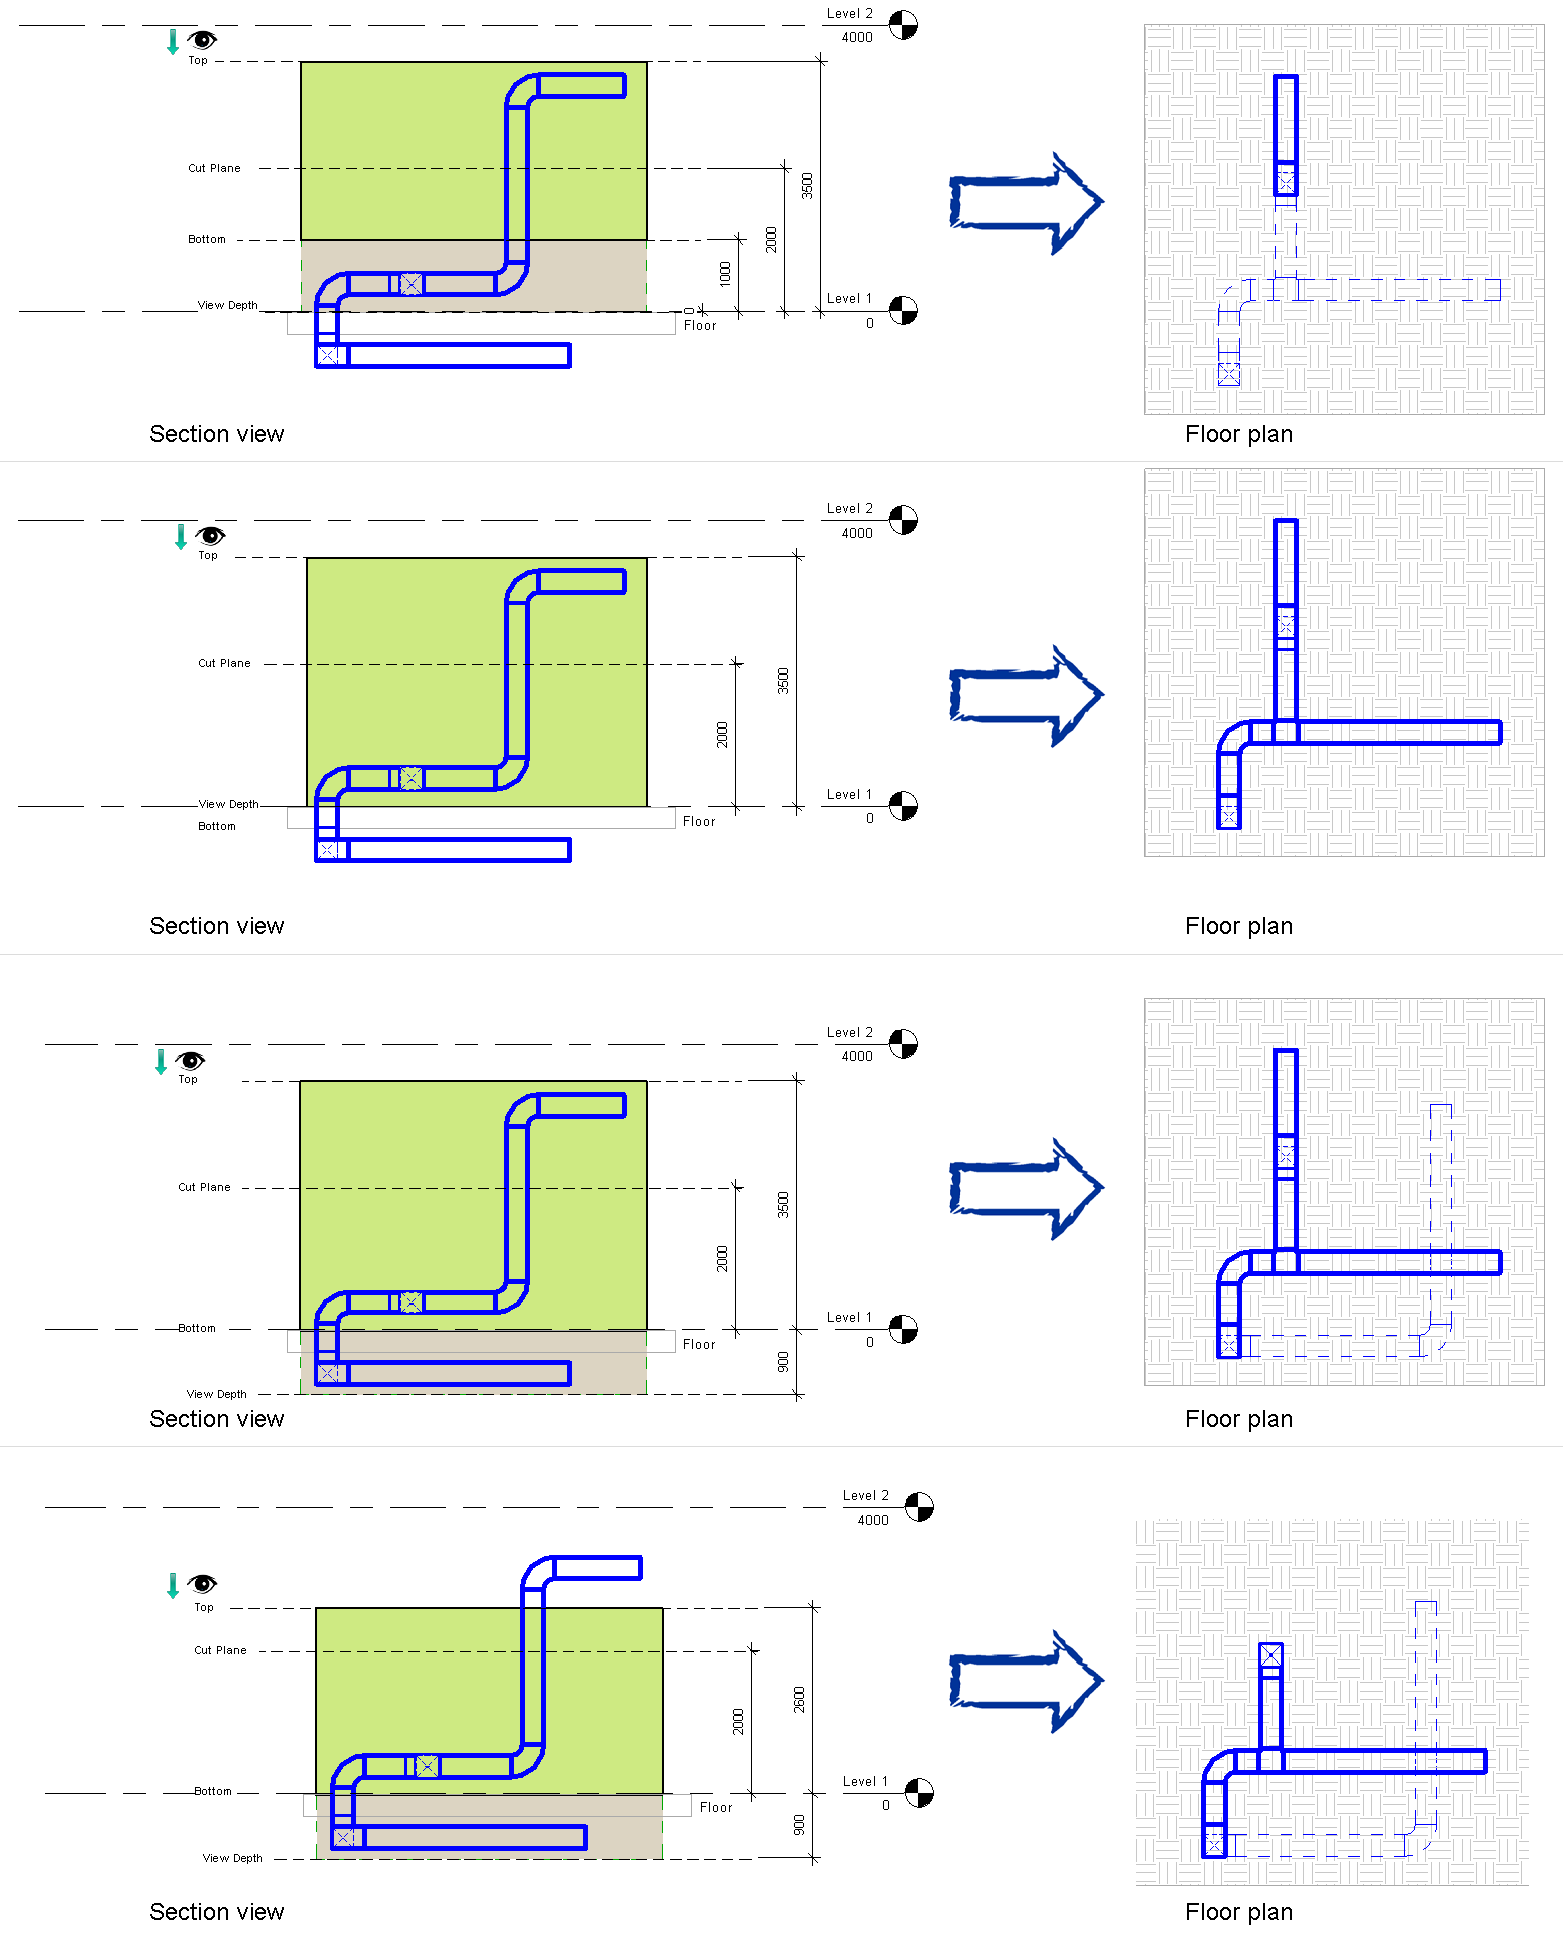
The View Range dialog has 2 parts, the primary range and the view depth. The values set in the dialog define relative positions of the horizontal planes that make up the view range. Because the view range is made up of horizontal planes parallel to the level of the view, it is easier to understand them by looking at a section view.

Revit View Range and View Depth Tips and Tricks CADtech YouTube
View depth is an additional plane beyond the primary range. Change the view depth to show elements below the bottom clip plane. By default, the view depth coincides with the bottom clip plane. The following elevation shows the view range of a plan view: Top , Cut plane , Bottom , Offset (from bottom) , Primary Range , and View Depth .

View Range and Depth Clipping in Revit YouTube
Share View Range Properties Define the set of horizontal planes that control the visibility and display of objects in a plan view. To access these properties, open the plan view. On the Properties palette, for View Range, click Edit. Parent topic: Plan Views Related Concepts About the View Range About Adjusting the Depth of a Plan View

Revit Tutorial Adding Depth to Your Revit Elevations (Revisited) YouTube
To open the Depth Clipping dialog, locate the Depth Clipping parameter in the Properties palette under Extents. Click the button labeled with the current Depth Clipping setting in the value column. Note: Plan views include floor plan views, reflected ceiling plan views, structural plan views, detail plan views, and callout plan views.
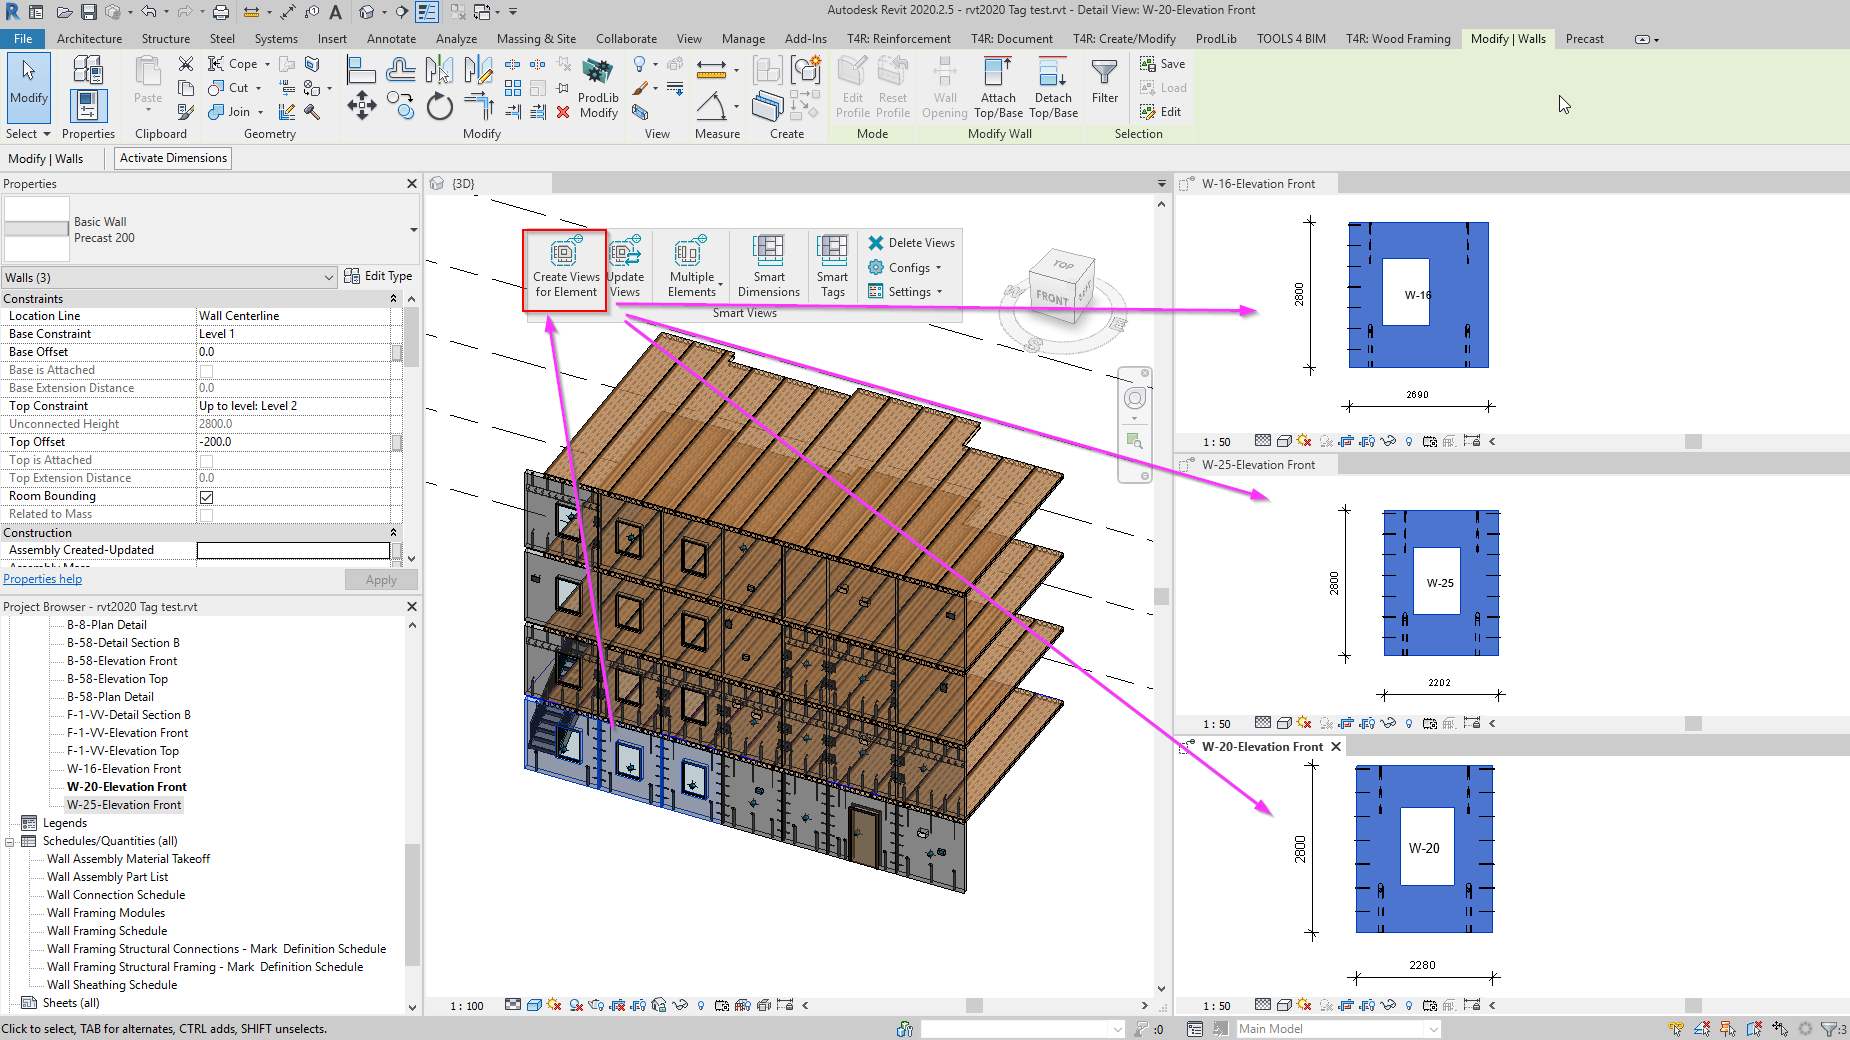
New features for Smart Views tool for Revit Automated views, dimensions and tags Agacad
The Revit View Range ( VR ) is made up of a primary range and a view depth. The first one is represented by three horizontal planes: the top, the bottom, and a cut plane. The top plane defines the top of the VR and the bottom likewise represents the bottom of it. And between them, we have the cut plane.

Revit 2017 Depth Cueing YouTube
When you create a section view, Revit sets a default view depth and width. By selecting a section and resizing its crop region, you can control more accurately what displays in the section view. Drag the controls on the crop region to resize the width and the depth of the section view, as necessary.

Revit 2017 Make Your Revit Elevations POP with Depth Cueing YouTube
Share Video: Use the View Range Adjust the planes of the view range to properly display elements in a model. This video demonstrates the following: Understand the definition of view range. Overview of the View Range dialog in the Properties palette. Illustration of view range settings in a section view.

Revit Tutorial Adding Depth to Your Elevations (Redux) Tutorials, Tips
Use the Depth Clipping parameter to display parts of a model below the cut plane. If you only want the wall visible in the plan view as it appears in the view range of Level 3, you can clip the wall from view using the Depth Clipping parameter. You activate this feature using the Depth Clipping parameter for the plan view. The back clip plane is defined by the View Depth parameter, which is.

View Depth in Revit 8020 BIM
You will learn how to use the view range settings in Revit. I will explain you the different parameters used in both the primary range and the view depth. I.
View Range in Revit for MEP Disciplines Part 2 UNIFI
The View Depth is the lowest part of the View Range and it occurs below the bottom so item number four there is the View Depth setting and if you set it below the bottom of the View.

What's New in Revit 2017 Depth Cueing and Railing Improvements YouTube
How do the View Range options work, and how is it different in floor plan views versus ceiling plan views in Revit? The following picture illustrates how the view range works: Note: The Cut Plane (orange line) in a Ceiling Plan is the same as the Bottom Clip Plane. The Bottom Clip Plane is disabled when adjusting the view range of a Ceiling Plan
